Would you like to discover some stylish photo ideas to inspire you? If you are looking for a photographer to immortalize an event, or simply to offer you a nice portrait, you may also be looking for new and original photos to take. In fact, it is not uncommon that the photographer of your choice offers you to show him/her the favorite photos you will have found, during a search for images in the theme you prefer on Pinterest or on different photo blogs.
If you are a photographer yourself, this article will help you discover new ideas and how to make them, from shooting to photo editing. Want to know more about capturing original photos and how to recreate them for inspiration? Check out our selection of stylish photo ideas and accompanying tips offered by the photographers themselves!
Create a photo you think is stylish without plagiarizing it
Each photographer who shows you one of their images here has spent long hours thinking about, staging, and shooting their subject. If any beginner photographer as by copying the photo technique used, the purpose of this article is rather to inspire you to stimulate your creative mind. Each image can challenge you on different points: - By its light (natural lighting well mastered, or flash management), - By the bokeh (background blur) created by combining the use of a telephoto lens and a large aperture, - By the frozen moment by changing the shutter speed, - By the original angle of view and/or distorting the subject, - By the photo retouching applied (skin cleaning, adding effect, overlays) - Etc Each photo can also inspire you by its artistic universe: its colors, its pictorial inspirations or other areas of the art world, its nods to famous artists. In short, so many sources of inspiration that we hope will sprout new photographic creations in your mind. Whatever the camera you use, succeeding in your photos for super stylish pictures is possible even with the iphone, if you have one of the best photo applications existing today on the market. You will see in this article that you need much more photographic mastery and that all the photos presented require very advanced techniques.
28 stylish photo ideas SU BLIMES
Discover our selection of stylish photo ideas and the photographers' directions for everything you need to know about the creation of each image!
JOURDAIN JEROME
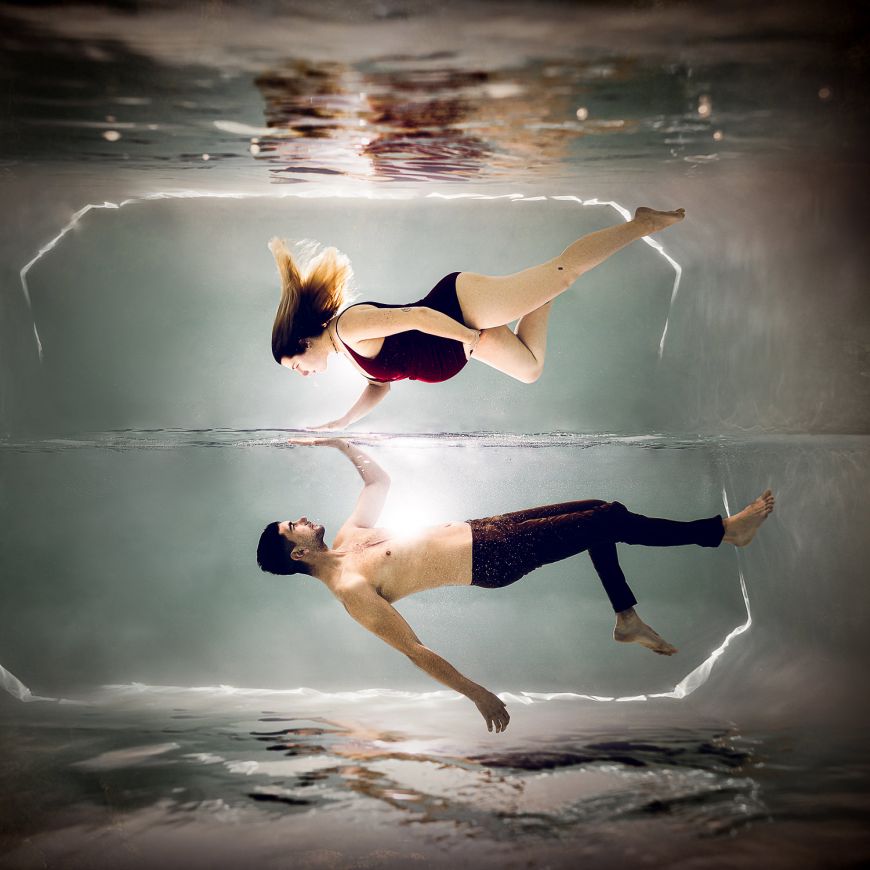
To reproduce this styled photo taken underwater
Photographer Jerome Jourdain's tips
Photographic equipment used: Camera: canon 5D IV Lens: 24mm canon Ikelite flash Ikelite waterproof case
The settings: 24mm. .100 iso...f/5.6...1/200s flash at 50%
This is a montage of 2 photos:
A photo in turn of the 2 models letting themselves rise to the surface of the water, hand forward to the surface...
The constraint apart from shooting underwater ^^ is to manage to have the models in the right position...
A little anecdote about this photo
the little anecdote is that the daddy-to-be is 2m03 tall, and I was forced to reduce his height a bit so that their face to face wouldn't look "weird" ^^
A gorgeous "bodypainting" pregnancy photo in the studio
Tony Mathis
The secrets of this styled photo
Photographer Tony Mathis's tips
I don't have the settings in my head, but basically it was with the 70-200 with the Nikon D850 . The constraint to make this image is the time spent for the makeup artist to make the belly painting ( about 2h30) " Steph body Painter " on Facebook and Instagram .
An anecdote about this photo
The anecdote I can tell is that I got sick right after the session. Probably too much pressure I put on myself to make it. Because technically you don't really have the right to make a mistake considering the time spent drawing, not to mention that the mother-to-be was not far from giving birth!
Stylish photo: kids become stars at professional photographer
David Bascunana
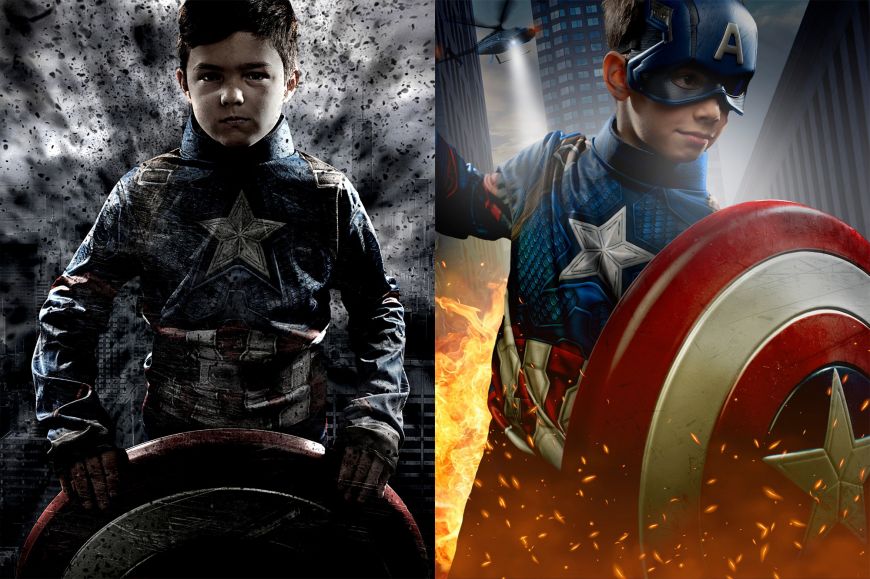
An incredibly detailed marvel-inspired reproduction for this stylish photo
David Bascunana
Making this type of styled photo in the studio
Photographer David Bascunana's tips
The most time consuming part of the process is the background image, which is a creation inspired by an image, a movie poster, of the superhero in question. On average, this represents between 4h and 6h of work on Photoshop. But this digital image will serve me for several children. So the biggest constraints are the mastery of Photoshop and all its tools, and all the possible ways to achieve the same result. My record being 125 layers for a single image. But it takes what it takes to have a more or less coherent rendering. For the past few months, I've started to get into 3D. Then at the time of shooting, I adapt my lighting to the light that has been initially recreated on the background image. If a light needs to be stronger on one shoulder than another, I use my light meter to adjust all those little details. I have a small studio you know, so I use my 35mm, I use at least 3 Elinchrom flashes, I can go up to 5 and add LED panels in continuous light if needed.
Before I did everything on a green background, to make it look like in the movies!!
But I realized, that the green background reflects green depending on how you arrange your lighting. And by adding other sources, in spite of everything to blur its returns, I did not have any more the result which I wished. We can besides see on certain films, for which it was used a green bottom and special effects, these same returns, I think in particular of the scene of the forbidden forest in Harry Potter and the school of the wizards. The first times I had seen the movie, I didn't realize it, it's since I've been facing this problem, that sometimes I spot it in movies. So for the trick I use a gray background.
Once the shoot is done, I just need to embed my image in my initial background with Photoshop and make some adjustments. If my image is clean and well done, normally I'm only 15 minutes of work for each image.
3 styled photos staged in studio
Trinley PARIS
The Melancholy Princess, a second staging by Trinley Paris
Trinley PARIS
Another stylish photo with a very successful staging
Trinley PARIS
Trinley Paris Photographer's Tips
This is staged photography. It's done in my studio. The background is a wall that I did rust style. The lighting used here is with 2 Godox flashes a 600 and a 200. I work with my Sony A7R2 and 24-70 mm lens usually. Nothing is added, nothing is removed. I study my staging, props and costumes (flea markets, Vinted, Emmaus).
On the Degas inspiration, there are 2 scenes a week apart then edit: 1/200th f/10 iso 320 and I have a small collection of tutus in different sizes.
For the melancholy princess, it's a model from Paris who has her own costumes.I went to look for the feather dusters in the wild because I already had in mind this decoration and I had all the rest and some fruits.
The settings are: 1/200th, f/11 iso 250. when you see the pictures on the back of the camera the atmosphere is already there. there are just a few details to refine. so a little passage in Lightroom to sort of flatten, deconstruct my image in some way, then go Photoshop to "rebuild" it level light, color intensity etc... Several dodge and burn mainly. And I only stop when what I see in Photoshop is consistent with what I had in my head before the shoot, which can go more or less quickly.
The photographer's inspirations
My inspirations come from everywhere, movies, music videos, museums, books and from all of that I make my own drum and it comes out this kind of image. Sometimes in my studio when I receive a client I have flashes, I see him in another time, so I start to dress him, sometimes with pieces of fabric, I create a decor that suits him, and here we are elsewhere.
3 stylish photos captured outdoors in natural light
Vanessa Renault
The shutter speed freezes the movement in the photo for a very stylish effect
Vanessa Renault
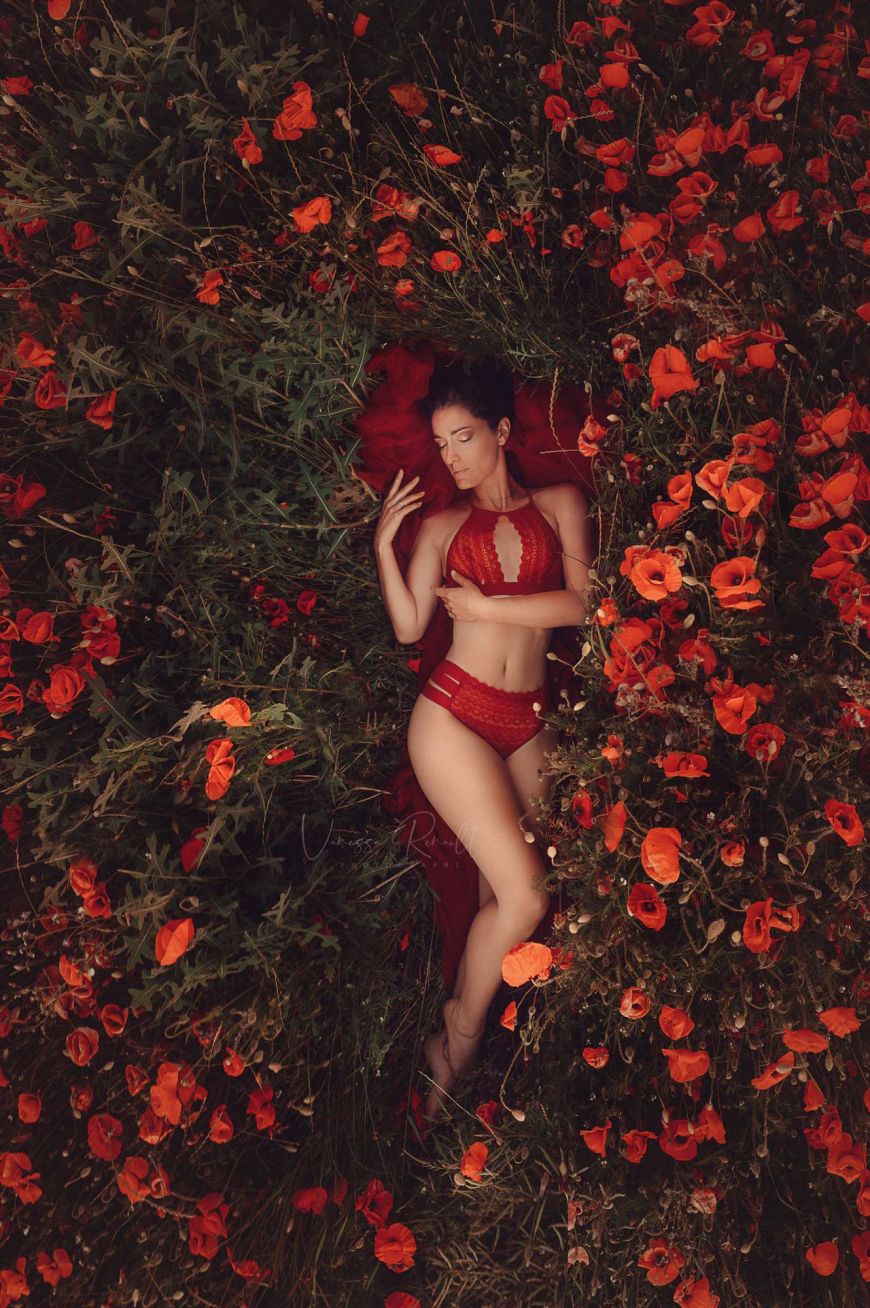
A photo with an impressive overhead angle for a very stylish result
Vanessa Renault
3 styled photos from the same photographer
Photographer Vanessa Renault's tips
Clicked in the snow : On the day of this session, I stepped out of my comfort zone, shooting in the middle of the day with the sun blazing and with a hyper powerful reflector the snow. Don't let the warmth of the photo fool you, it was -5 degrees and a -15 degree feel. I have never been so high in speed, the limit of my body
Setting 1/8000 Iso 100 open 1.4 Lens 35mm from Sigma art
Shot in water : For this Session I had to put myself in silt up to the pond... Help, I hate not seeing what's going on underwater. This photo was done in two shots to get the effect of the water on both sides The difficulty was to not move too much with the river current. Settings: 1/800 Iso 200 open 2. 8 Lens 70-200 in 2.8 Tamron Poppy shots: This shot was made with different shots, the 1st one being the model then several all around her to add poppies on the composition. Anecdote: even with a stepladder, arms outstretched and my 35mm, I was still not high enough ^^ Advice: take a stepladder of 5 steps. Settings: 1/20 (yes I know but I do not like to go up in Iso) Iso 320 ouv 7. 1 35mm lens in 2.4 from Sigma art
A stylized "in the manner of" photo by Rebecca Ponchel
Rebecca Ponchel
Photographer Rebecca Ponchel's tips
I always work with my Nikon D750 and a 50mm. Here I used my Jinbei continuous light with a 140cm memory octabox. Light at 45 degrees of the model in a slight dive. This was a day when I was a little bored and wanted to spend some time on Photoshop. So I started to scroll through the photos I liked and saved on Insta. I found James Rupapara's photo and wanted to take inspiration from it but go with something else.
My settings: 640 iso 125/s at 3.5
I took about 2 hrs to create this photo counting the time to find PNG elements to add and that are free!!! In any case, I wanted the tones to be in gold, brown, orange and desaturated skin. I really like dark tones, somewhat mystical or fairytale atmospheres. I cleaned the skin lightly, puffed up the hair and then and desaturated the skin. Zooming in on the photo, you can also see that I added watercolor and "runny" paint spots, I love this effect I think it gives an offbeat, unstructured feel to the photo (see inspiration photo 4) I painstakingly add the PNGs and start erasing the areas so that everything comes together. It's not enough to just lay them down, it has to be harmonious, it's all in the detail. After finishing all of this, I wasn't happy with the look I wanted. I wanted whiter skin, less human and I wanted the model to stand out. When it's like this, I take my eyes off my screen and come back to it 5 minutes later, it allows your eye to see the photo differently and adjust the curves, which I often do along the way. So I decided to make the model "matte" which makes it stand out from the rest and I used an action from Color LAB's Royal Collection I love using it and playing with it because often the little thing I miss I find in the result of its actions.
I am very happy with the result because it reflects what I like, what I feel and I managed to transcribe on this photo the idea I had in mind. I find that taking inspiration from other photographers is a good basis because the goal is not to copy. My goal was to achieve this result by trying to make the style that I like in this photographer and this brings me to MY work, my retouching. Because my sensitivity is different, my model is different, my experience is different. For me there was no difficulty in achieving, there was only progress in my retouching!!!
The basic inspiration and creative steps in retouching for this styled photo
Rebecca Ponchel
A very original styled photo with many effects
Rodolphe Massonat
Photographer Rodolphe Massonat's tips
There are a lot of things to be said about her. First of all it is part of a personal project composed of 24 images.
I regularly do personal projects, it is an essential point to get out of your comfort zone and make your style evolve, your level in photography... I have done several of them, often for charity. Before becoming a photographer, I was a nurse anesthetist and I was often on call for 24 hours. I stopped working as an anesthesiologist for 4 years to devote myself to photography. One day I wondered if I was still able to last 24 hours. That's how the idea of doing 24 hours of photography was born. I then looked for a theme that could interest me and get me out of my field (portraiture). Dance appeared as an obvious choice. It's a complicated field, you have to anticipate to capture and retranscribe the movement, work at high speed, sometimes with flash and above all understand the expectations of the often demanding dancers.
The project slowly matured and this is how I decided to make 24 images in 24 hours. I started at 6am on the Loire River in Tours with 2 dancers, at 1pm I was in Paris at the foot of the Louvre Pyramid with 2 other dancers, at 9pm in front of the Monaco Opera House with 2 dancers and I finished at 6am in front of the Matisse Museum in Nice (the initial project was to have me finish in Marseille but there were some hiccups).
Before launching myself I had carried out a few tests with a dancer in Tours. What had struck me was that when the dancers launch themselves and are in their dance, it seems as if nothing can reach them. The world around them can collapse, they are in their dance. I knew from the beginning that I wanted to destructure the environment around the dancers. The treatment of the color came only afterwards. I was inspired by the day I had experienced, a contrasting day that had ended, against all odds, in front of the Matisse museum (for the bright colors).
As for this image, I worked with a 35mm f1.4 sigma Art mounted on a 5d mk4 from memory at f2.8 and 1/2000.
The difficulty was working on a busy location, in the middle of tourists, without it showing. I was literally lying on the ground for this one. I had to manage to capture my image quickly so as not to exhaust either the dancer or my batteries (I was traveling without a charger). It was also necessary to quickly put at ease the dancer that I did not know 5 min before and understand her style, her expectations... This is not the case on this image but for some I used a remote flash (elinchrom elb 500).
The project was supposed to be exhibited and sold for the benefit of unicef but this phase took time and the covid came to thwart all that. I don't despair of relaunching it.
Emilie Maillet
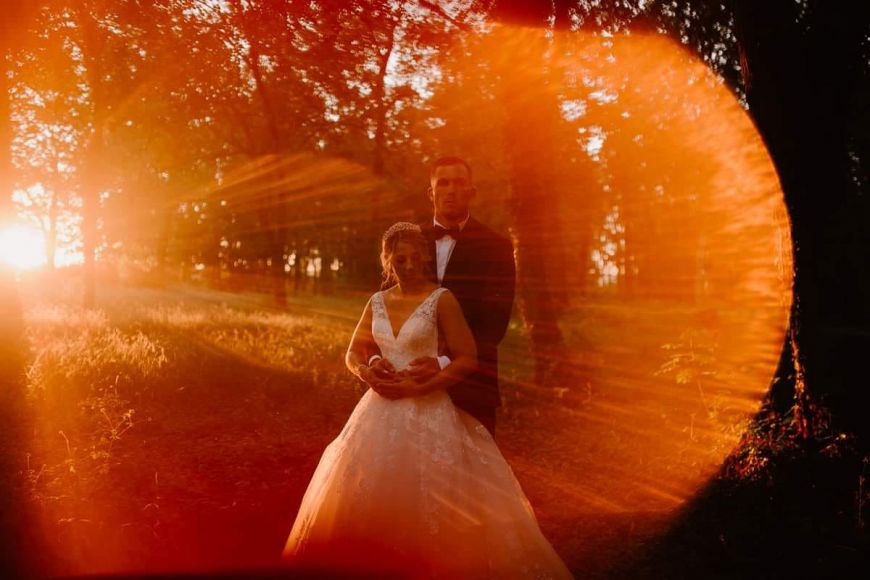
Photographer Emilie Maillet's tips
This is a photo taken at 35mm, Settings are: aperture 1.4, shutter speed 1/160 and Iso 160. No flash.
To make this picture, we were really at sunset, and I used my wedding ring to create the flair. It's a technique that was advised to me by Mathias Callènes of Callènes film with whom I worked on this wedding. It's not difficult in itself, but I think it can only be done at a specific time of day. I've never done this technique again, it makes me think that I could use it tonight in an engagement session.
A remarkable point of view and composition for a very stylish photo
Florian Maguin
Photographer Florian Maguin's tips
This image is shot at 24mm, 400iso, f5.6, 1/100s.
This is an image I had in mind before the big day, as the bride and groom had told me about this dome, and they had sent me a phone picture to show me. For the record, we did the wedding photos at the place where they met, which was their university. So it was pretty cool to be able to make a picture like that in a place that may seem perfectly common to a lot of people. Technically the picture was not complicated to make. The hardest thing was being symmetrical, I was hand held lying on the ground, so I had to find the right place to lie to get the circles right. The other constraint was that if the bride and groom were standing normally against the railing, you couldn't see them at all. They both had to bend over a bit to be seen. And we had to find a compromise between "seeing them well" and "you can see that they are leaning".
For the little anecdote too, I am particularly fond of Stanley Kubrick's cinema. The bride and groom being cinephiles, the groom also liking Kubrick a lot, he very quickly understood and recognized what I was trying to do with this image. Far be it from me to compare myself to Kubrick of course, but it allowed me to make a little nod to a filmmaker I love, with his symmetrical compositions in millimeters, and especially the scene from 2001:
A Space Odyssey, with this image
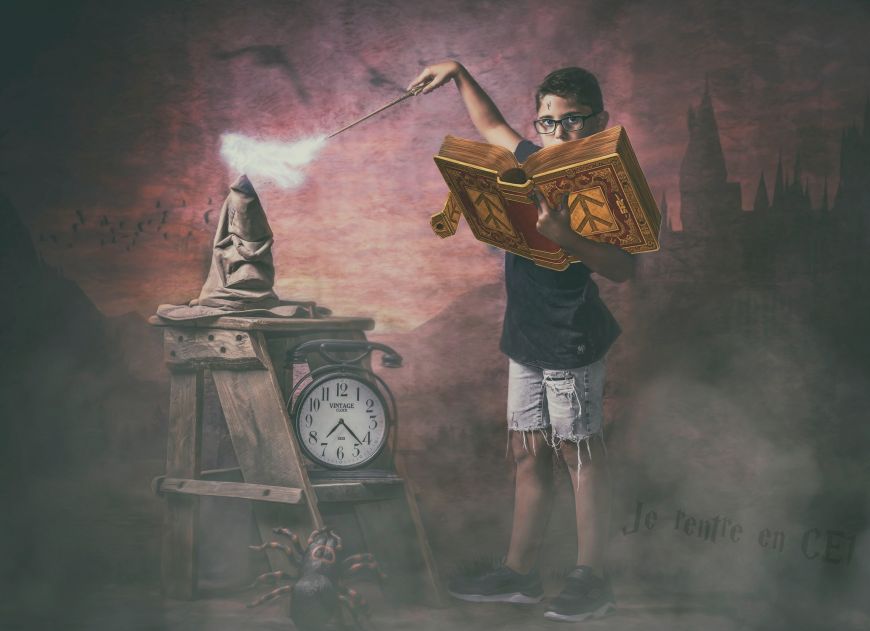
A "Harry Potter"
Anne Marie Boninu
A stylish photo for kids who want to be apprentice wizards
Photographer Anne Marie Boninu's tips
From memory I used a 50mm surely at 1/125s , f4 and ISO 100 . With a single light source at 45 degrees to try to have a Rembrandt rendering.
I wanted to make a back to school photo in the wizarding world of Harry Potter but with an everyday outfit
This little boy is a Harry potter fan .that's why the "choipeau" on the stepladder that in the film chooses the class of students .
The background is a brown textured background or I added a scanned image of Hogwarts ,As well as the smoke and grimoire .
The clock to evoke of course that it is time for the return to school ...
The time spent on the shooting very fast , I only tried several poses to be able to find the right and the right look . After that it goes into retouching a little bit in the fine art way but less advanced.
This photo is not at all complicated to make if you master Photoshop well !
A stylized photo in breakdance mode
Celine Aubert
Figure the movement in the studio for a very stylish portrait photo
Photographer Celine Aubert's tips
I was at f9 for 1/200. Focal length 40mm (lens 24/70).
I used a black background, imitation wood vinyl floor (because I didn't have black vinyl and I needed a smooth PVC surface, no paper or fabric so the dancer could move well).
I have 2 long softboxes on each side of the model with each one a different gelatin. I had also placed 2 RGB led panels on each side but directed more towards me.
Finally, I sprayed smoke with a machine. This picture is taken when the smoke is well dissipated throughout the room but I have others where the smoke is more drawn. There, on the photo it allows to "melt" the colors between them. To have a softer rendering.
The difficulty for me is in the space because the studio being at home I don't have 200 m2 and a ceiling height of 3m ^^ So to make a person dance it's quite tense because we have to block her in her movements. she can't express herself as she would like. And I'm not talking about the multiple poses airing out the room to clear all the smoke and then starting over ^^
Two very stylish and original newborn photos
MARTINE PICAUD
Another styled baby portrait photographed
MARTINE PICAUD
Styled photos taken with infants in photo studio
Photographer Martine Picaud's tips
The 2 New- né were created more differently than I usually do.
I created the setting quietly and made a composite photo for the 2.
I always try to put some Pep's in each Gallery of my moms-to-be by letting them choose between their classic photo as they could have done it anywhere, or with my touch.
Everything is shot on the 2 photos in Studio. I work with Flash, with a 180cm Umbrella, with 35mm, here my Sigma Art, on my CANON 5D Mark IV.
I always keep an Idea Book not far away, where I empty my ideas. and as soon as it is possible for me to create them I make series.
Ane Anecdote for this one, in reality the Carton would be 2x too small to put a baby in it.? But that's what makes it easier to picture the baby in the scale of the TOY STORY characters.
A very stylish breastfeeding mom-baby photo
Ella Elijah
A beautiful portrait, a very stylish artistic nude photo outdoors
Ella Elijah
Sensitive portraits for highly styled photos
Photographer Ella Elijah's tips
1- Breastfeeding
Lactation sessions in a tableau setting are one of my specialties.
I use a 35mm fixed focal length, an Rx-one flash as well as a plain grey paper background to make these photos (the tableau effect is only a retouching effect I created for myself).
These sessions go very fast! A baby doesn't wait. I ask the moms to position themselves as they would position themselves to breastfeed their child (their comfort is paramount) and then I place a veil (or not depending on the moms' preferences).
There is no particular constraint for this kind of session. I will simply say that you have to be comfortable with children, be patient and above all be on top of your game when it comes to taking pictures because once baby is done, it's over!
2- Artistic Nude in the Forest
For this photo I used a 35mm fixed focal length photo lens and with a light reflector to unblock the shadows which were quite large that morning.
It was 8:00 am and it had just rained just before. The sky was very cloudy and it was cold. I asked the client to undress and my assistant for the day helped her get settled on the rock that was located in the middle of the river.
The most important thing was to be efficient and to go fast to avoid the client getting cold.
A wonderful child portrait for a very stylish photo
Rebecca Ponchel
The styled photo being created | step 1: the shoot
Rebecca Ponchel
The styled photo at the time of retouching
Rebecca Ponchel
A styled photo imbued with enchantment and magic
Photographer Rebecca Ponchel's tips
Settings: 800 iso, f4, 1/50 second. Natural light
My settings are not at their best because I was in a guest room with little light so I increased my ISO but I didn't want to go above 800 for grain quality. I also didn't want to open the aperture more to gain in brightness because my lens doesn't have the best sharpness in large aperture and especially that day I had just done several sessions of boudoir shooting and my eyes were starting to get tired. You'll tell me why I took this picture then? Because that day there was my daughter (it's her on the picture!) and she had put her pretty princess dress and I knew that the picture I wanted of her was now! As if in a freeze frame I imagined her as Sleeping Beauty! At that moment I knew that I was going to be able to realize a photo that I had in mind for a while. Each photo has its story and when I look at this one it tells the story of a mother in admiration of her sleeping little girl! It also tells the story of the Boudoir shoot I had just done and my daughter absolutely wanted to accompany me because she wants to become my makeup artist on the shoots and my assistant!
So as a mom, I can only agree with this idea. But this side of the story no one can guess and it wasn't meant to be. I realize as I write that actually the symbolism of things in general affects me a lot!!! I reveal myself a lot in my photos and I have a lot of different universes!!!
Let's talk about technique
the biggest difficulty was not to move to avoid blur given the speed used and also to have a framing that could allow me to work the photo. With my 50mm, I had to get up high because not enough distance to get the face and tulle and dress. I was on my tiptoes, on a chair and also with the view directly on the camera screen. That's why I love my D750 because it has a swivel screen, so I was able to move my camera forward into the middle of the scene. My mom also held my legs because it was all very perilous. Don't forget to breathe slowly and stabilize the camera as best as possible!!!
My daughter had a blue dress and I laid her on the floor with a small pillow under her head and put 10 yards of soft tulle underneath
I didn't do much in the way of retouching. A light dodge and burn on the face and the folds of the dress.
The biggest was done to "enlarge" her hair and crop and even out the tulle
For this I used the manual transformation tool . You have to actually select the hair roughly with the rectangle tool and after right click manual transformation and I stretched her hair. Then one of my favorite tools, fluidity pr give it volume and waves.
For the tulle I cropped my photo wider especially at the dress ,because I had no distance to be able to shoot also the dress, by checking the option content taken into account and photoshop managed to create me more dress in my content.
I used the same process as for the hair. One tip, the stamp tool is not ideal pr add fabric. It's fine for small touch ups but there with the manual transformation I had more freedom.
I used Gaussian blur to soften the image and give that cloudy side
I matched the blue of the dress with the blue of the tulle which didn't suit me . I used hue and saturation : I take the dropper of this tool, select the blue of the tulle and play with the sliders.
Then I use more and more another tool pr finalize my images it's the "gradient" tool ; it allows to give to the general photo a harmonious gradient of color. I still lacked a velvety, light effect, so I took my eyedropper, selected a soft blue in the photo and then the "gradient" tool, being careful not to put it on the skin. Then I play with the opacity to make it very very soft.
I touch up the brightness and contrast at the end because if I do it before and then play around with different tools for the color, I'll have to do another brightness and contrast shot anyway.
I also removed the red from the skin in Camera raw , color mixer, hue and saturation
One detail was bothering me it was the zipper on the dress, you could see the fastener up, so I erased it.
To finish a little magic with Squijjoo's glitter overlays and it's all done!!!
I think I spent 30 minutes retouching. The longest is when you play with the sliders and look for the right color , saturation.... But whatever the result is as I wanted it!!!
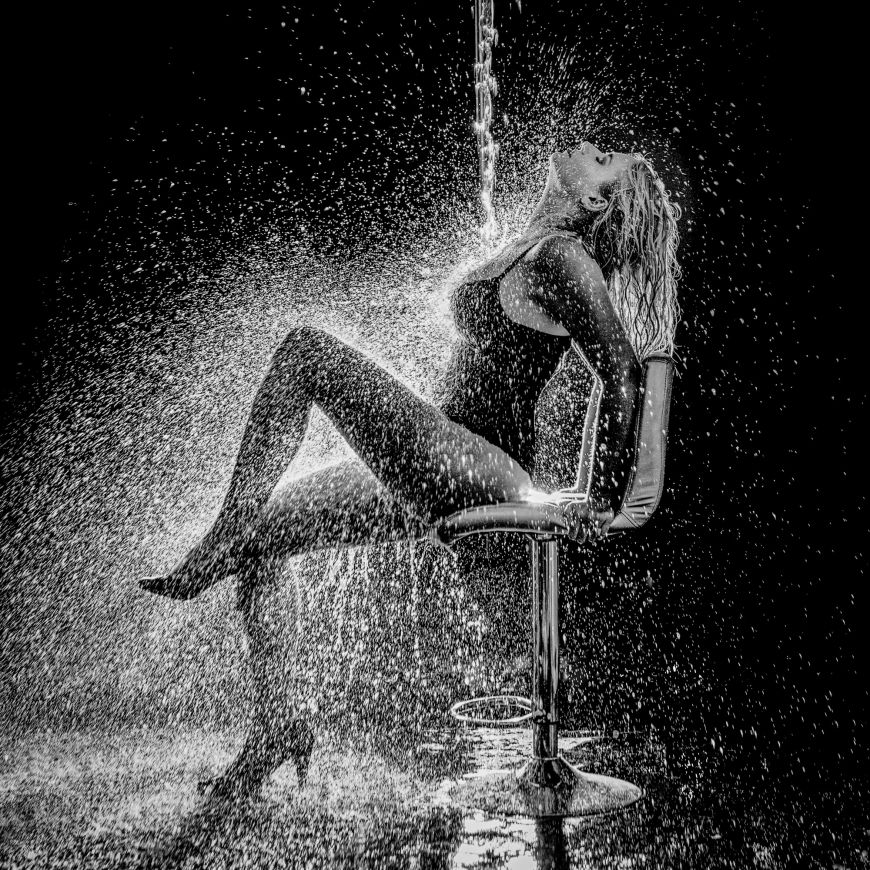
An amazing portrait, a very stylish photo with frozen movement
Daniel Lengaigne
Creating highly styled photos by playing with shutter speed
Photographer Daniel Lengaigne's Tips
October 2016, I regularly post on Facebook what I like to share, that evening a replay of the movie "Flash Dance". Several of my friends comment, Faustine* writes "I love this movie, especially the end of the first scene (the shower on stage). I contacted her privately and offered to do a session without giving her more details. She is not at her best but answers me : "if you organize something, I will come. The next day, I pierce the ceiling of the studio and install a toilet flush. I get everything I need to avoid flooding the studio (tarps on the floor and walls). I suggest to Faustine that she create our version of the photo inspired by the film. As soon as the photo was released, it stood out and many of you voted for it. Summer 2018, a Photo Challenge is proposed by the photo magazine "Chasseur d'images" on the theme "The body and water", I participate for the first time in a challenge and the editorial staff calls me back to tell me that my photo has been selected for broadcast and that it would be on the cover. Our photo will also be awarded in 2021 on the international competition Regard d'Auteur by the highest distinction.
Technically, a single flash in backlight near the background equipped with a snoot and a honeycomb to focus the beam. The difficulty is to hide the flash behind Faustine's body so that it is as little visible as possible. Two tries were necessary before getting the final shot. Very little post-production: contrast enhancement and masking of the flash stand.
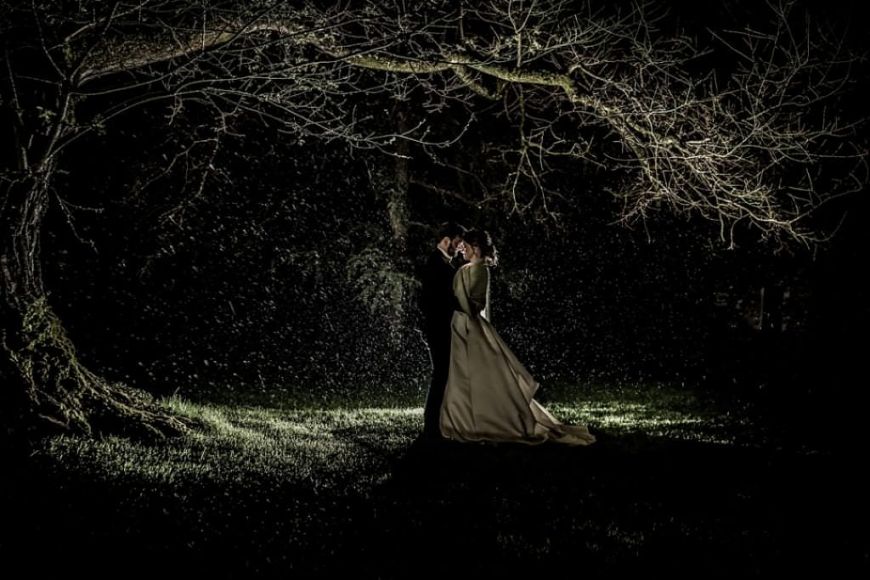
Use backlighting to illuminate the backdrop in a very stylish photo
Stephane Laville
Stylish wedding photo with backlighting
Photographer Stephane Laville's tips
So for the technical side:
28mm, F/4 , 1/40 Iso 200. For lighting behind, Godox v1 remote flash 1/4 power.
I wanted to make this photo so that the bride and groom would have a "wow" effect because the bride and groom were unlucky ( covid 2021 postponement on 2022, death of the bride's daddy 3 months before the wedding and to top it off, It rained all day long on April 23, 2022 while the domain was superb so we couldn't do any outdoor ph